I started my husband's landsknecht shirt about 2 weeks ago. I haven't worked on it religiously, but I doubt it would have taken more than a few days if I had. At any rate, half way into completing one of the gussets, I found a very basic guide on how to do sewing. I'd always thought you knotted the end of your thread when you sewed and apparently this isn't the case. According to "Home And School Sewing" by Frances Patton (1903), the only instances where you knot the thread is with basting, gathering, various stitches on flannels and sometimes with sewing buttons. I'd never considered this. Therefore, it made a heck of a lot more sense to me once I read how to deal with the loose ends on hemming without using knots. Needless to say, half of his shirt is sewn improperly, but from here on out, I'll use the techniques in the book and things will come out much smoother. :D
I'd never actually considered basting either, but it makes a heck of a lot more sense than using pins, which don't appear to have been as prevalent during period. At any rate, learning leads to confidence, which leads to more garb. I'm all for that!
Friday, June 6, 2008
Sunday, February 24, 2008
Hemd
Feb 23, 2008
I started this project with the drawings I've posted to my SCA German Renaissance Research blog.
I took a piece of fabric about three times my daughter's width. I took this measurement by going from the inside of the ball joint of her shoulder to the other. I simply did a rough guestimate without actually taking measuring tape measurements. After I actually cut the material I found the Grainline article and realized I cut the material the wrong way. (Doesn't that always figure?) Thankfully, it was more than generous in the measurements I took originally even though the skirt itself will be shorter, but it will still be long on her. Cool, huh? I'd only cut the material the one direction, so the other still had the selvedges. Btw, I am just using a plain light-weight cotton, originally about 45" wide. I'll work with better material when I know what I'm doing.
So, I pulled out the stitching I'd originally started... [shown here] This is what I'm considering is how you're supposed to do these stitches. All assumption on my part.

 It's gathering nicely, so I hope my first assumption wasn't bad, but what in the world do I do with the edge? If I take it from the gathers and try to sew it down, do I hope it works right? It's rather bulky to work with it this way, so somehow I'm assuming this is likely not the right method.
I started this project with the drawings I've posted to my SCA German Renaissance Research blog.
I took a piece of fabric about three times my daughter's width. I took this measurement by going from the inside of the ball joint of her shoulder to the other. I simply did a rough guestimate without actually taking measuring tape measurements. After I actually cut the material I found the Grainline article and realized I cut the material the wrong way. (Doesn't that always figure?) Thankfully, it was more than generous in the measurements I took originally even though the skirt itself will be shorter, but it will still be long on her. Cool, huh? I'd only cut the material the one direction, so the other still had the selvedges. Btw, I am just using a plain light-weight cotton, originally about 45" wide. I'll work with better material when I know what I'm doing.
So, I pulled out the stitching I'd originally started... [shown here] This is what I'm considering is how you're supposed to do these stitches. All assumption on my part.
Feb 24, 2008
Then I started with the correct fabric orientation and realized I had another problem...
It's gathering nicely, so I hope my first assumption wasn't bad, but what in the world do I do with the edge? If I take it from the gathers and try to sew it down, do I hope it works right? It's rather bulky to work with it this way, so somehow I'm assuming this is likely not the right method.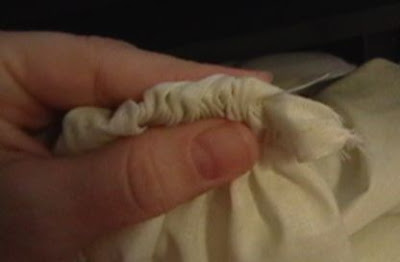
So now I'm trying... duh-duh-duh-da-duh! Doing the hem and gathers at the same time, like in the following:

I pressed the material with my fingers, not quite in thirds and worked on tacking down the lower stitch first. The upper stitch was easier if I didn't have to worry about keeping the material in place while I was stitching, like I had to do with the lower edge.

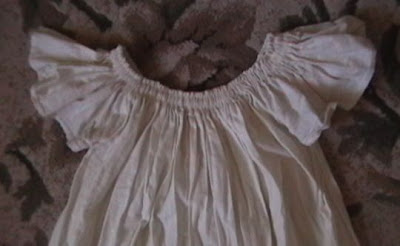
This is how it looks from the front with some of the edge gathered and some not. When it's not gathered, you can see the hem on the back showing through the material, BUT once it's gathered, it's gone.

Here are the same gathers from the back.

Jun 06, 2008
To make a long story short, tho I actually finished the hemd, I neglected to post as I went. Bad me! Here's a photo of the complete hemd.
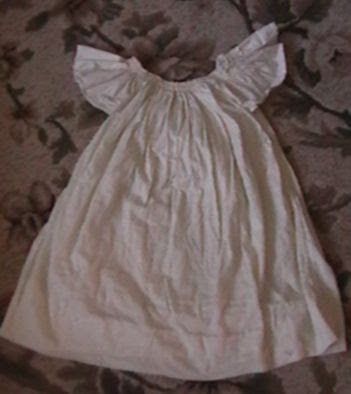
 ... butterfly sleeves and all. I hadn't really intended the sleeves to look like that, but considering she's a 3 year old that will be running around in the summer wearing something along these lines, it should work. She's already worn this a few times, hence a nice grass stain on the hem I need to wash out, but hey, she had fun. :)
Saturday, February 23, 2008
Material Basics
I am attempting to make a hemd for my daughter as an example for me. I need to make more than one for my husband, myself and my daughter at any rate and I figured doing one for my daughter, who incidentally is only 3, would be a nice experiment to start. I'd waste a lot less material if I messed up on hers and, if I succeed, I then have a pattern for all of us. At any rate, I was doing a little research on the construction. It seems like a simple enough pattern, but there were a few things I wasn't taking into consideration.
Before we get into that, I started this project how I normally seem to start sewing... I jumped in with both feet thinking I knew what I was doing and whah-la! I cut a piece of material that I realized wasn't quite right. How did I realize that? Herein lies the purpose of this post. I did a little more research, more by accident than anything, and I realized there was a bit about material of which I had NO clue. I'd heard the rumors before, but you know how rumors go. You don't always want to believe everything you hear...
At any rate, I found this article that was kind enough to explain it in such a way that my brain could comprehend it. It used pictures. :D
SewBasic: Grainline
This 3 page article is great and helped me to realize a few things that didn't really make much sense to me before now. I understood bias, sorta. I knew the technical 'why' it worked, but I didn't really know the full 'why'. I didn't understand that the warp and weft really made that much of a difference either. Knowing which threads are the warp threads and which are the weft does affect the end result, but I wouldn't have really believed it until I read over this article. So I read it, played with my material and a lightbulb went off in my head. Some of the mysteries were being explained!
I was thrilled, until I realized I had to redo what I'd started for my daughter, but thankfully I'd put enough material into it that I'll only have a little waste and since I'm playing with a really cheap cotton, the waste is going to be irrelevant.
Hopefully, what I conceive in my head concerning this hemd means that it won't really take all that long to put this together. OH, btw, I'm doing this all by hand. No sewing machines, period. Zilch, zip, nada. Sorry, it's the whole historical recreating thing.
Next: Constructing Jacque's Hemd
Purpose
The main purpose of this blog is to have a place to post the various things I'm learning about sewing. I'm not a seamstress by any stretch of the imagination. In fact, I think sewing was never intended for my brain to understand. BUT, being the persistent person that I am, I keep trying. I've also determined that making clothing is an art form. That being said, it requires practice. It's not like baking where all you have to do is follow a recipe by the book and it'll turn out just as it should. Sewing requires knowledge of so many bits and pieces that I've never bothered to pay attention to. Eventually, if I'm diligent, it'll become second nature like it seems to come naturally to so many others... I can only hope.
At any rate, I had a secondary purpose. I didn't want to clog up a blog I've dedicated to German Renaissance research with 'basic sewing for idiots'. That being said, on to the real posts!
At any rate, I had a secondary purpose. I didn't want to clog up a blog I've dedicated to German Renaissance research with 'basic sewing for idiots'. That being said, on to the real posts!
Subscribe to:
Posts (Atom)